


Free Course: Using Ticket Pricing Rules and ID Coupon Codes (Lesson 4)
If you’re just tuning in, welcome to our free course on using digital ticketing for school events. Jump to the bottom of this page to view previous lessons before starting this one. Now that you’ve created your ticket packages and passes, what about the pricing? Sure, you can create flat rate pricing for each ticket, but what about auto-triggered price changes?
Let's dive right in and talk about advanced pricing rules.
What are advanced pricing rules
Advanced pricing rules allows users to auto-trigger price changes based on the number of tickets sold or a specific date they set.
For example, let's say a promoter wanted to sell tickets under $20 until the end of the month or the first 50 tickets sold (whichever comes first). They can set this up, telling the system to automatically update all the prices when those criteria are met.
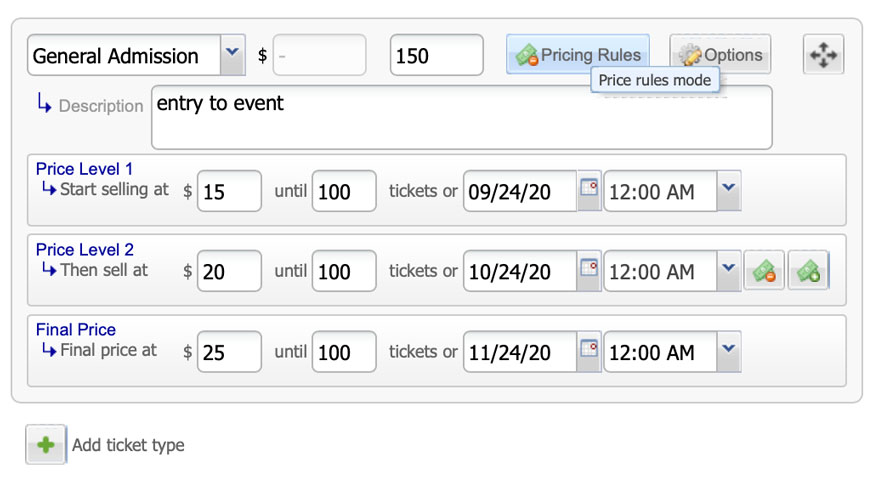 A common way to use pricing rules is to sell tickets at a discounted rate prior to the event online. When the day of the event comes, automatically increase the price online and at the door. You can also use these for campaigns like “early bird discounts” or “limited time offers”.
Using Purplepass’ advanced pricing rules
-
Log in to your Purplepass promoter account
-
Click “Create New Event” in the navigation bar or edit an existing one
-
Scroll down to the section titled “Ticket Pricing and Options”
-
Find what ticket type you would like to apply pricing rules to
-
Click “Pricing Rules”
-
Set the criteria for each level of pricing
Using student or staff IDs as coupon codes
We’ve all seen or even applied coupon codes prior to checking out or making a purchase online. Coupon codes are used to apply special discounts unique to that code.
For example, a company is promoting their product launch by doing an early bird discount campaign (Get 10% off your first purchase with the promo code NEWPRODUCT). Sound familiar?
However, for schools and educational programs, these codes are used a little differently.
Using student IDs as coupon codes
Promoters can upload a bulk list of student or member IDs to use as coupon codes. Once all the IDs they need are uploaded, they can be applied to an event, allowing members to enter their IDs at checkout for a discounted price or free access.
ID codes are great for:
-
Online class registrations
-
Lectures
-
Extra credit or extracurricular activities
-
Certification courses
-
School events (discounted tickets for students)
For example, if students want to attend an event that offers discounted prices for them, they can enter their ID at checkout online to receive the discount.

Schools can also use codes and auto-triggering to monitor how many tickets students are granted. For example, graduations are usually limited on the number of tickets allocated for each student.
Instead of relying on staff to manually distribute tickets and keep track of what is left, schools can use coupon codes to distribute the certain number of tickets each student is allowed to purchase. Then, if using auto-triggering, more can be distributed out at a later time if tickets remain.
Using student IDs are also great for tracking purposes. For example, if a teacher is giving out extra credit to students who attend a specific event, they can use their IDs for tracking. Students just need to enter their ID code online when purchasing tickets, and teachers can use Purplepass' reporting to track which students attended that event.
Creating coupon codes in Purplepass
-
Log in to your Purplepass promoter account
-
Click “Create New Event” in the navigation bar or edit an existing one
-
Scroll down to the section titled "Ticket Pricing and Options”
-
At the bottom is where you can add coupon codes. Click the green plus button where it says “Add coupon codes”.

-
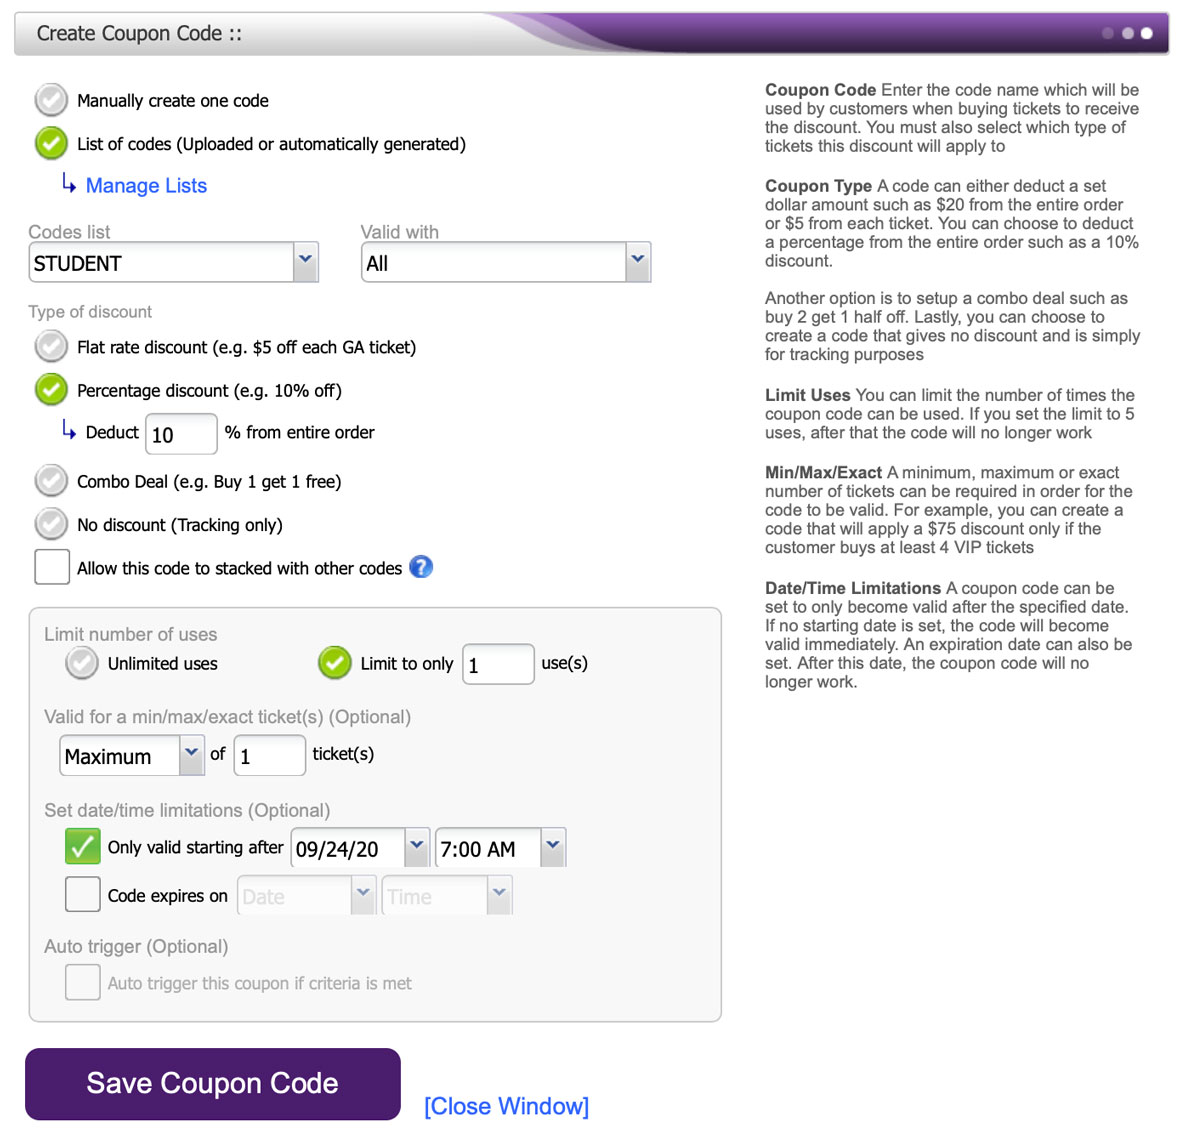
The “Create Coupon Code” window will appear
-
Click “List of codes” and click the blue link “Manage Lists”
-
Here is where you can upload your ID codes
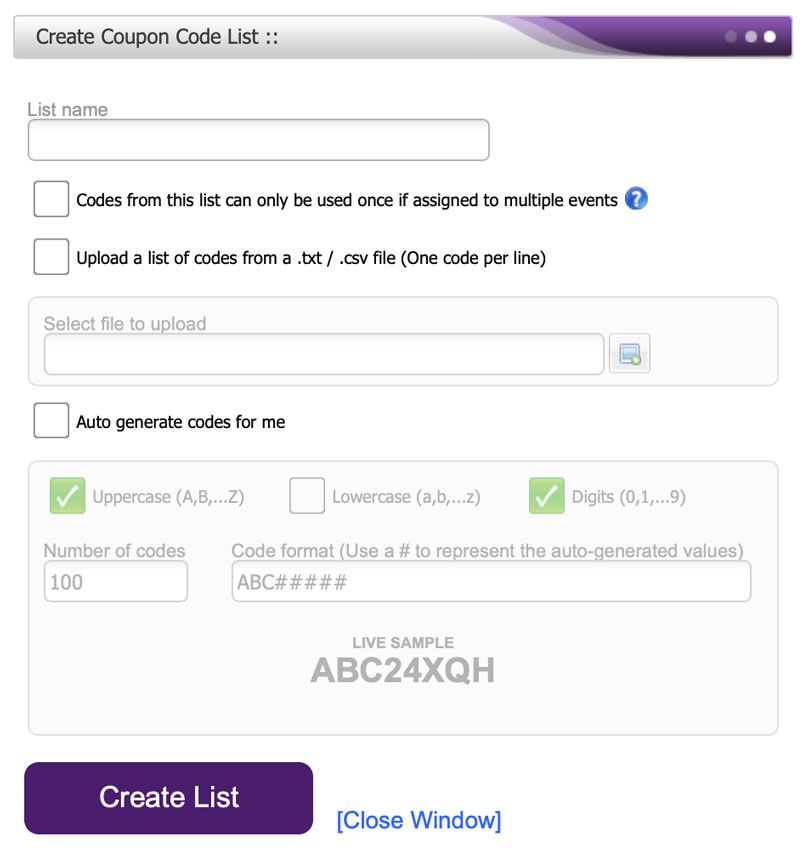
Once your list has been uploaded, go back to the “Create Coupon Code” window and add your list. From there, you can customize the type of discount you want to apply and its number of uses.
|
Lesson #5Using ticket widgets for your school website
|

View previous lessons
Lesson 1: Using digital ticketing for your school
Lesson 2: 5 steps for creating an optimized school event page